Creating & Updating Your Address Book for Seamless Mailings

When sending Hallmark greeting cards—for any occasion, such as birthdays, team or client appreciation, or holiday campaigns—having an accurate and well-organized Address Book is the key to making the process seamless.
At Hallmark Business Connections, our make-it-easy services let you personalize and send cards to hundreds (or thousands!) of recipients with just a few clicks. But to make sure every card arrives at the right place, at the right time, your recipient data must be formatted correctly and kept up to date.
Why Setting Up Your Address Book Matters
Setting up your Address Book correctly saves time, prevents delivery errors, and helps you stay organized for future mailings.
Save Time – Upload once, send anytime. No need to re-enter addresses for every campaign.
Avoid Delivery Errors – Proper formatting means fewer returned or delayed cards.
Segment Your Contacts – Easily organize and store multiple address lists based on contact criteria.
Plan Ahead – Schedule recurring campaigns (e.g., birthdays and anniversaries) with ease.
What You’ll Learn in This Guide
This quick-start guide (plus video tutorial) will walk you through:
How to create your Address List using our downloadable template
How to format and upload your list (and avoid the most common mistakes)
How to update, edit, or segment your contacts for future mailings
By the end, you’ll be ready to run personalized card campaigns with confidence—while we take care of the printing, postage, and delivery.
Watch the Video Tutorial Below to Get Started:
Three Ways To Begin:
Whether you’re sending a one-time card from our ‘Shop Now’ selection, scheduling predictable and recurring Automatic Mailings, or preparing a list in ‘My Account’ for future use—we’ll guide you through every step.
Starting from ‘Shop Now’ Selection
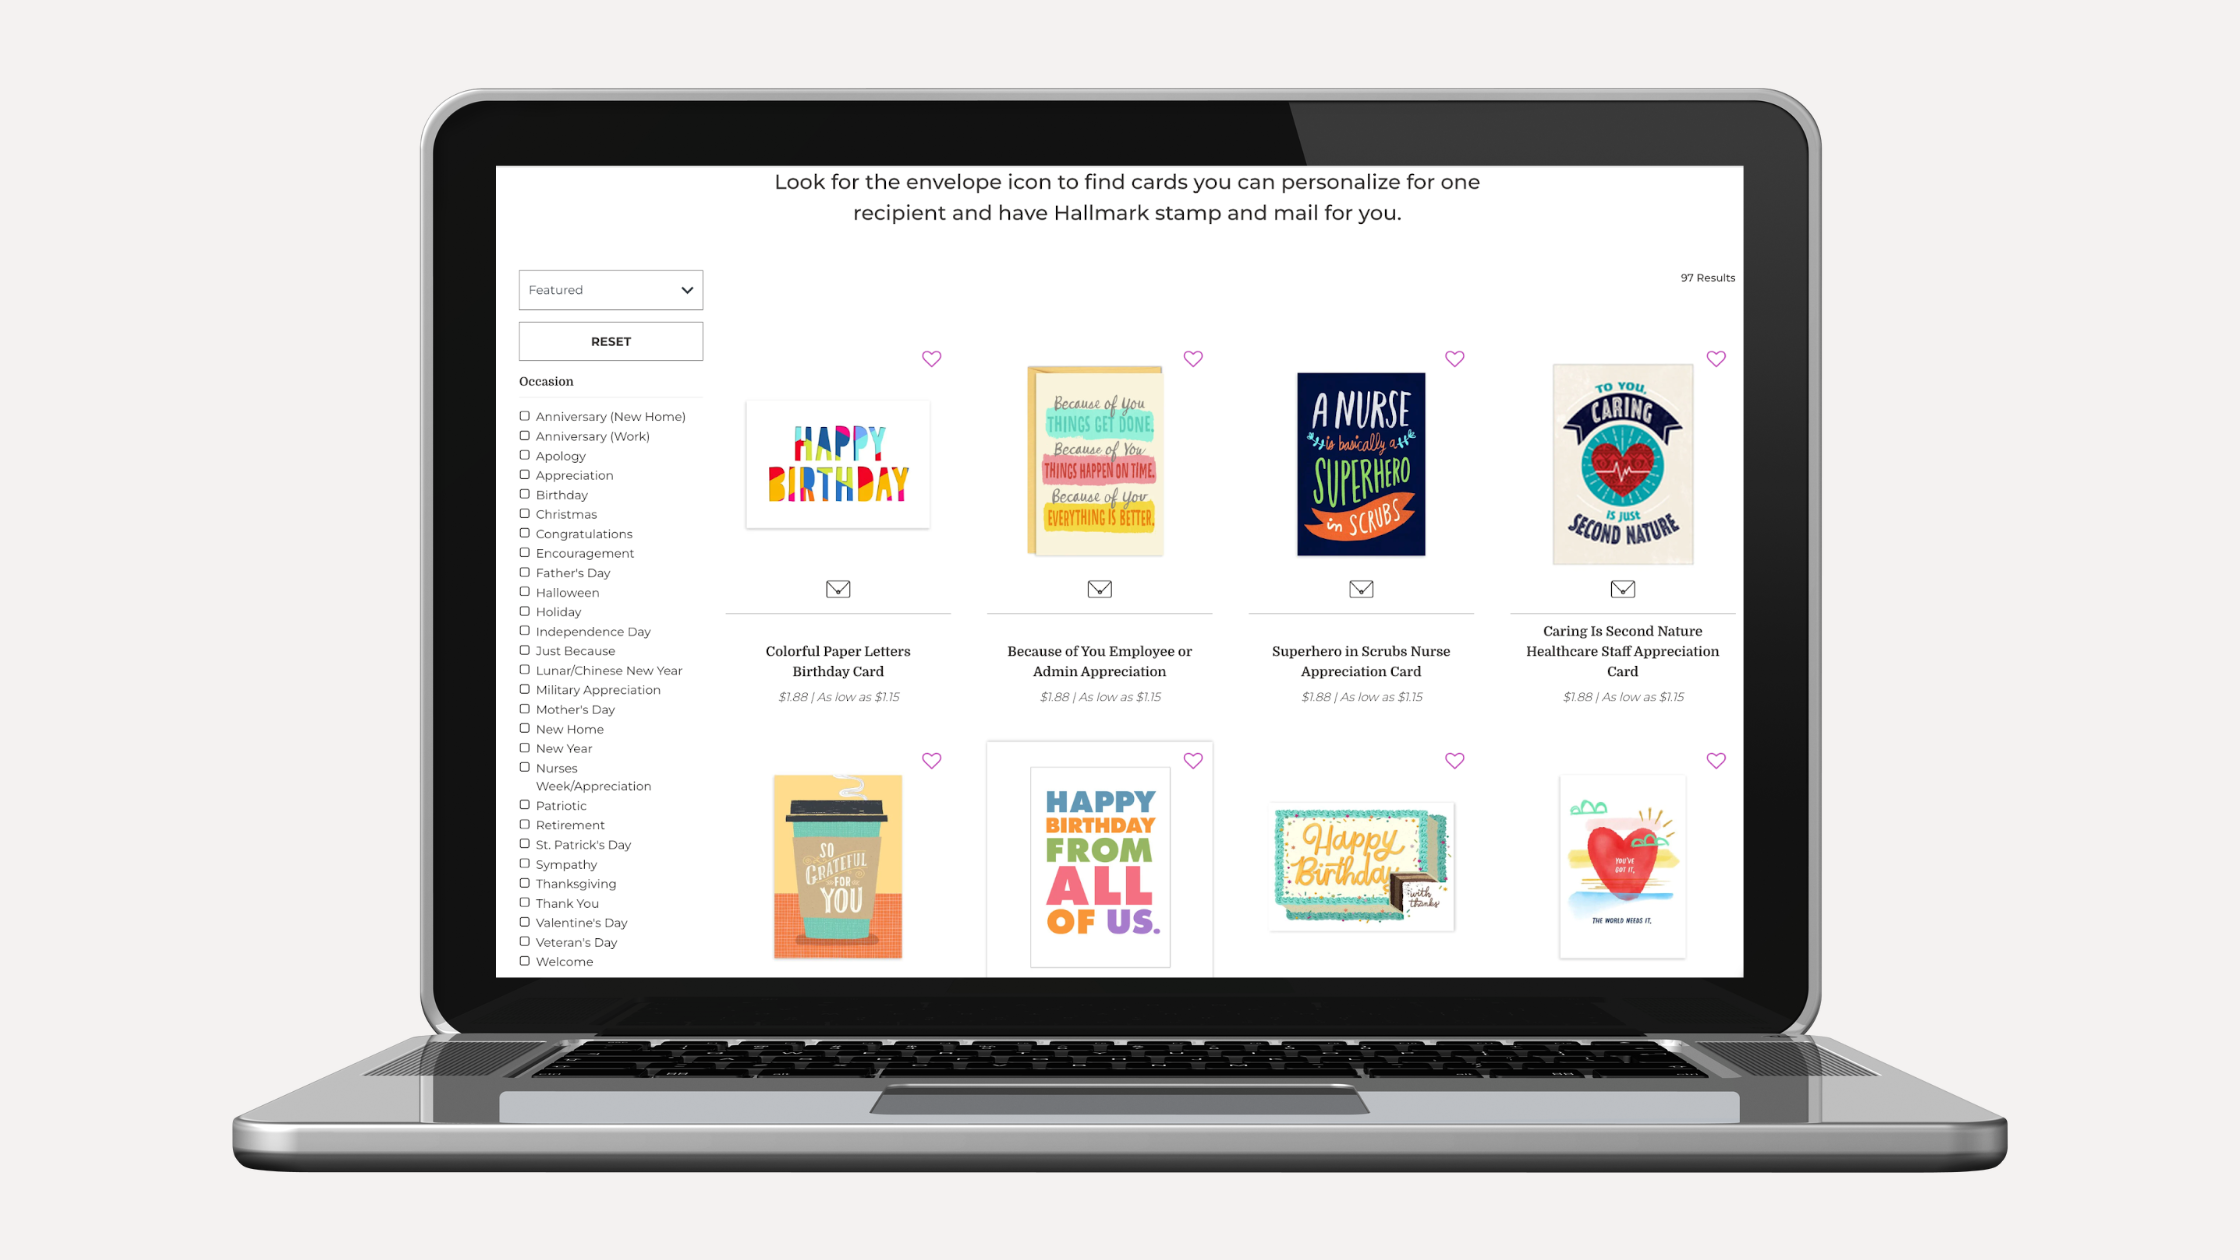
If you're ready to send a card from our ‘Shop Now’ selection to a list of recipients:
1. Choose your card and personalize it.
2. Under ‘Recipient Addressing,’ select either:
Affix Stamp + Mail on my Behalf
Affix Stamp + Mail on my Behalf (International)
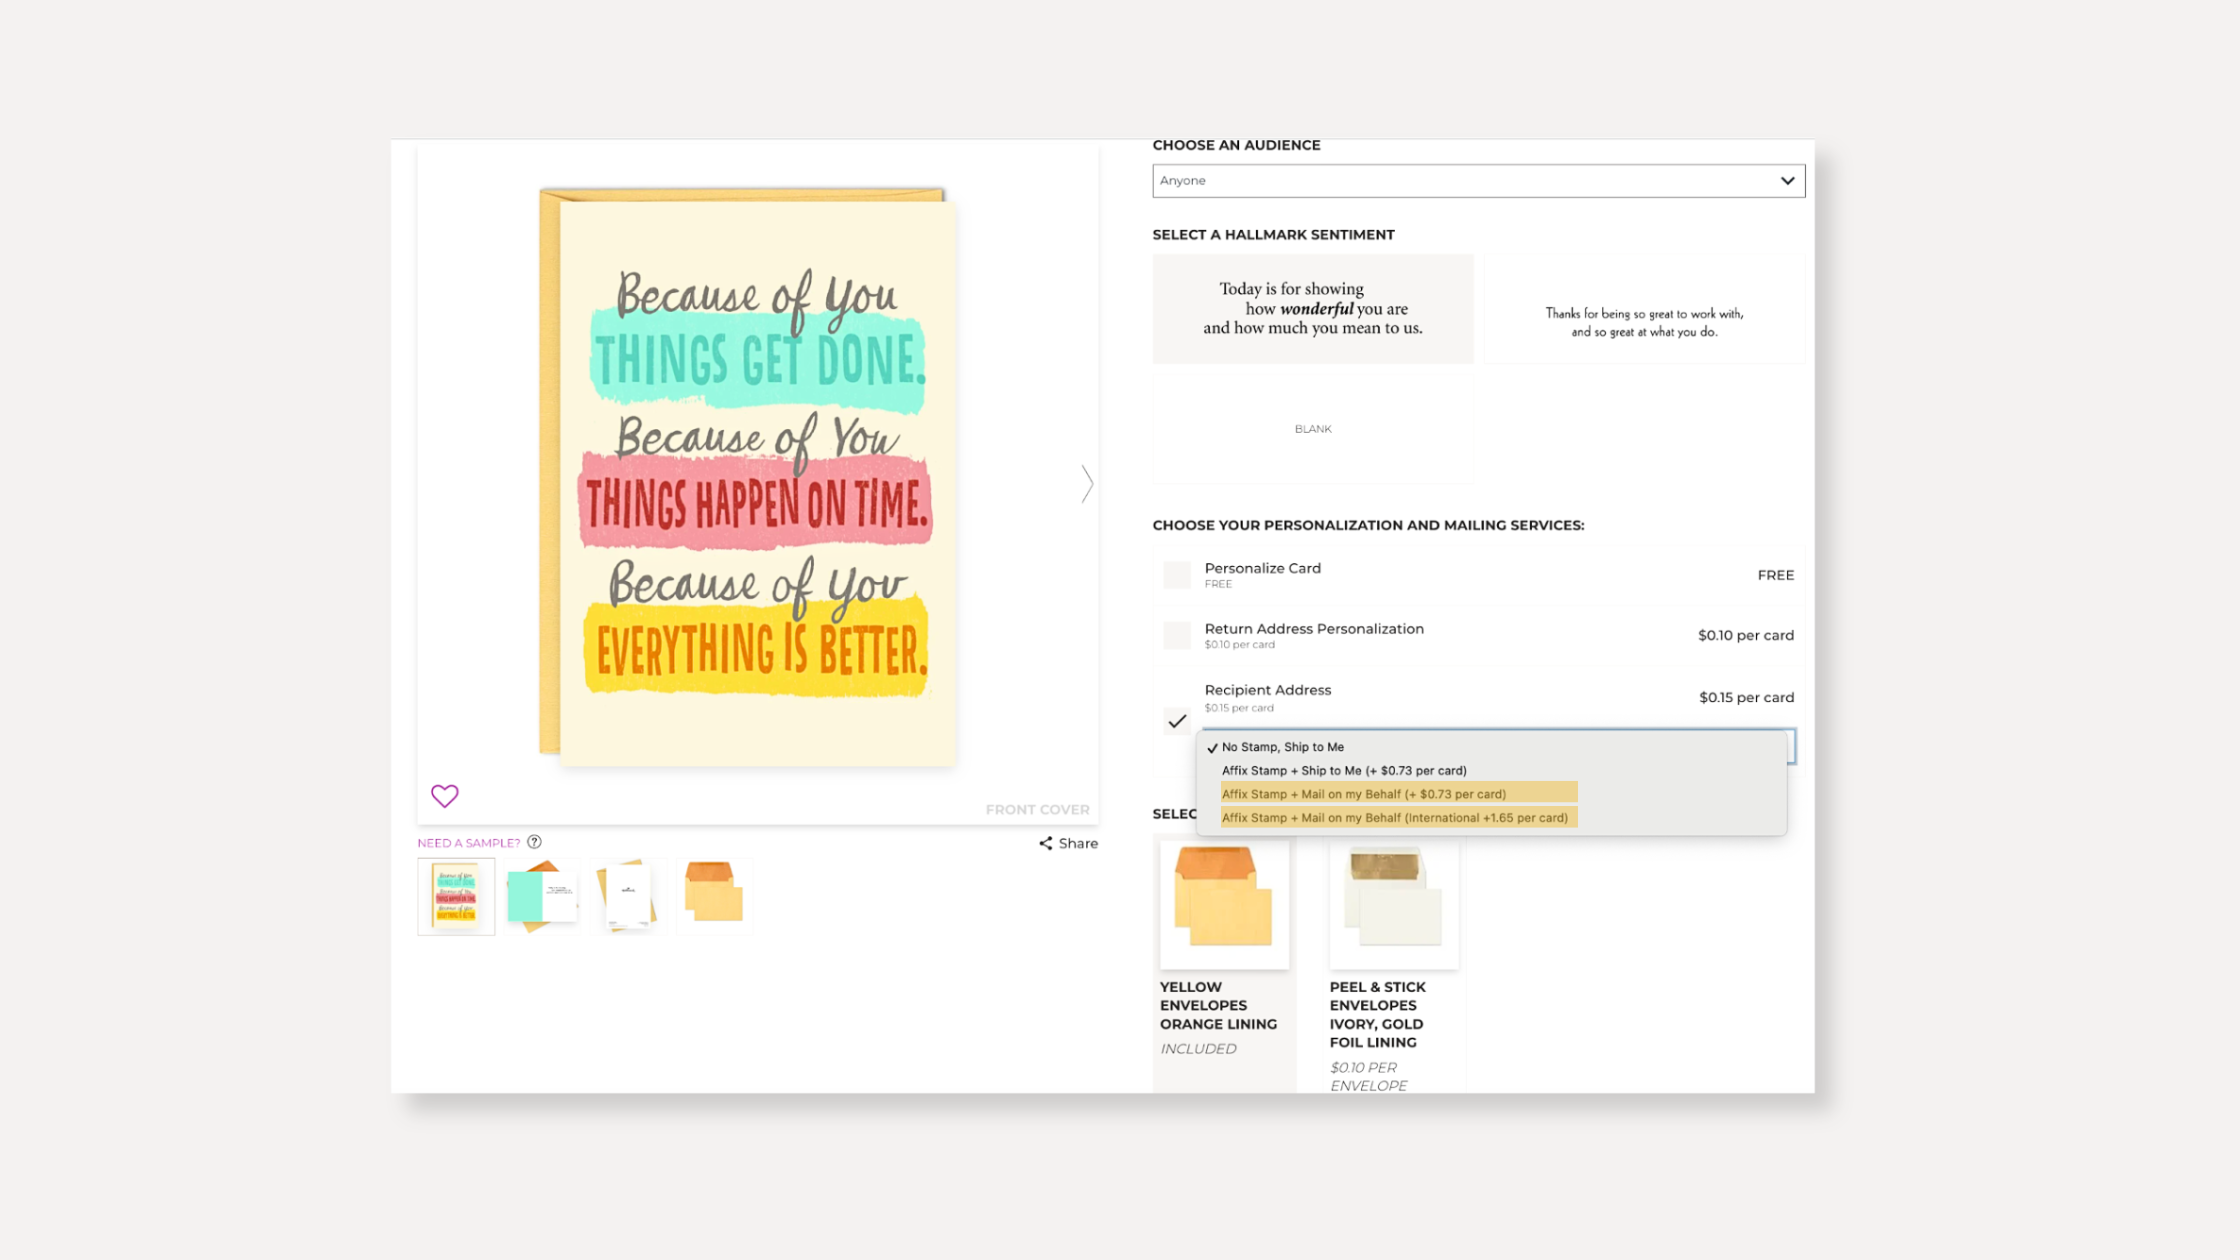
3. Click the yellow ‘Select Recipients’ button and choose ‘Select From File.’
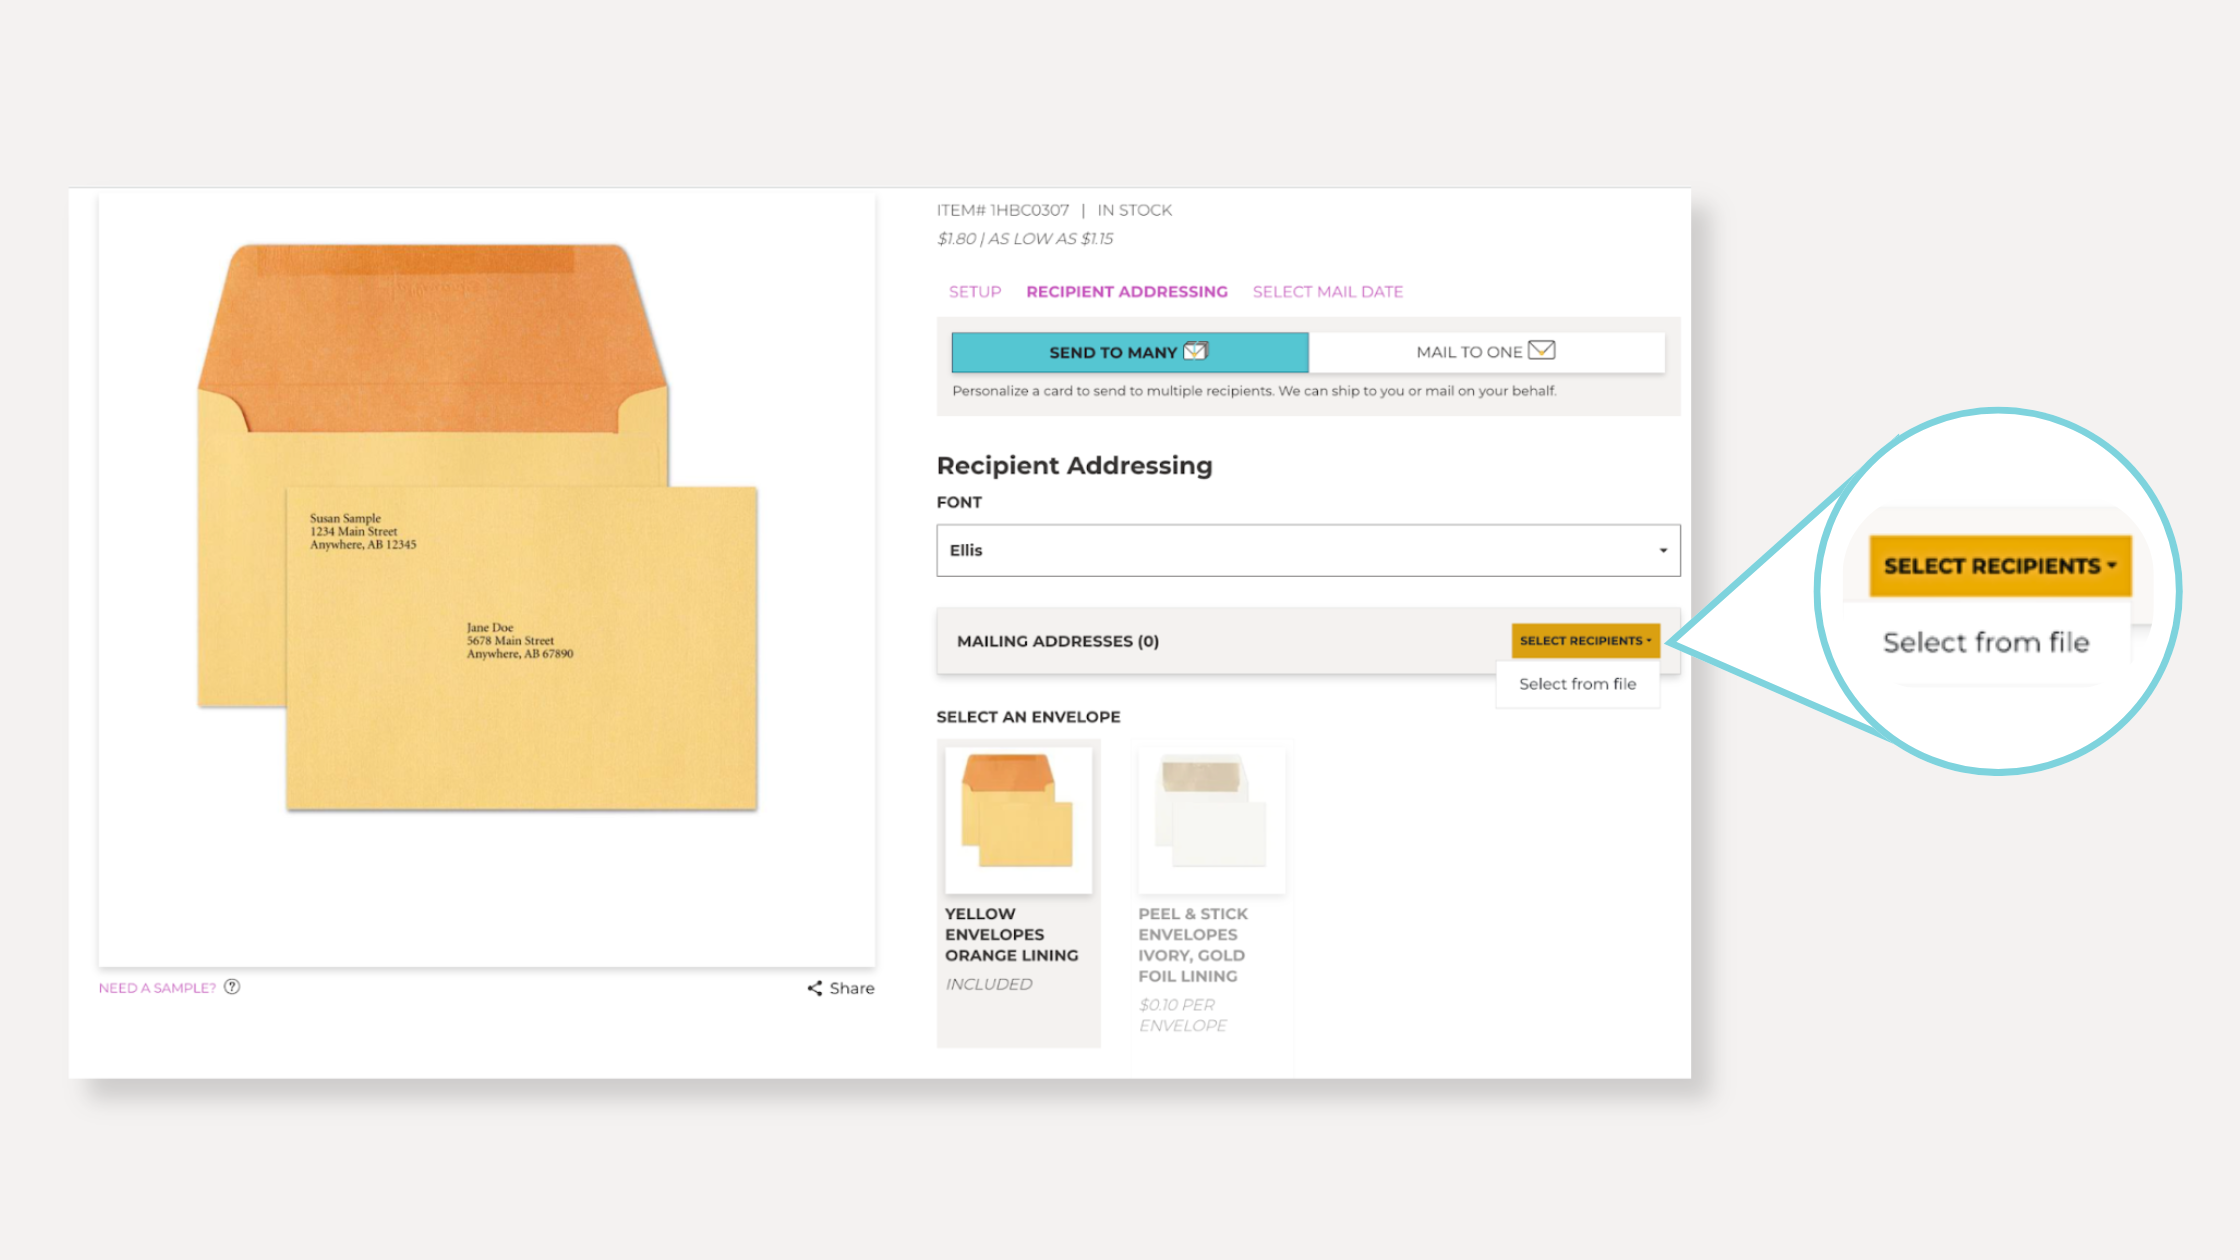
4. Then, follow the Template Download + Upload Instructions below.
Starting with ‘Automatic Mailings’ Setup
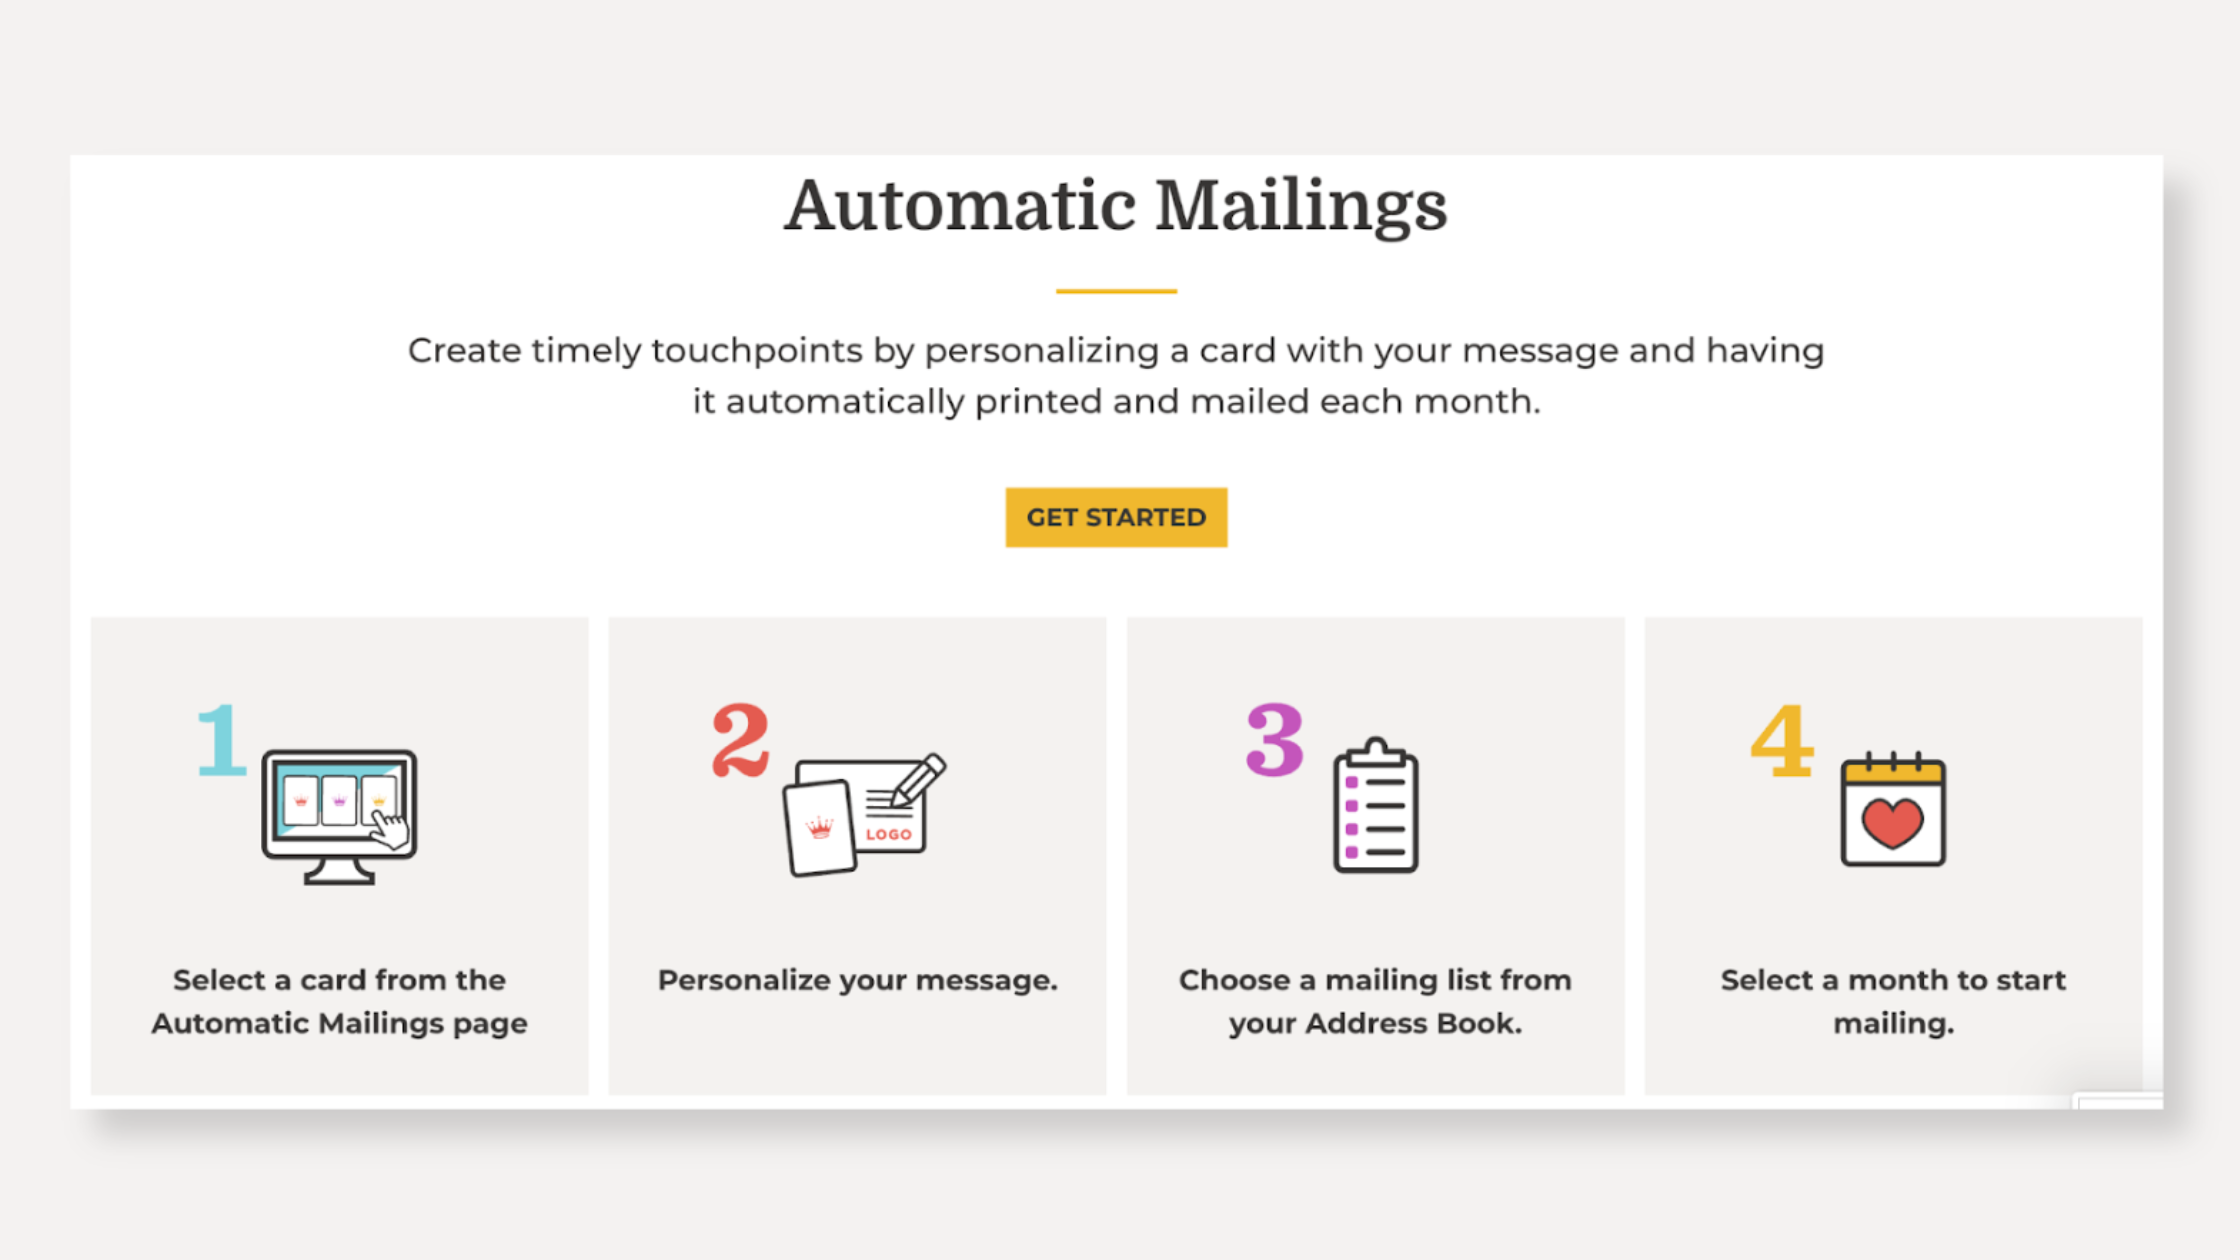
If you're scheduling an Automatic Mailings campaign:
1. Click ‘Get Started’ on the Automatic Mailings page.
2. Choose your card and personalize it.
3. Under ‘Select Existing or New Address List,’ click ‘Create New List.’
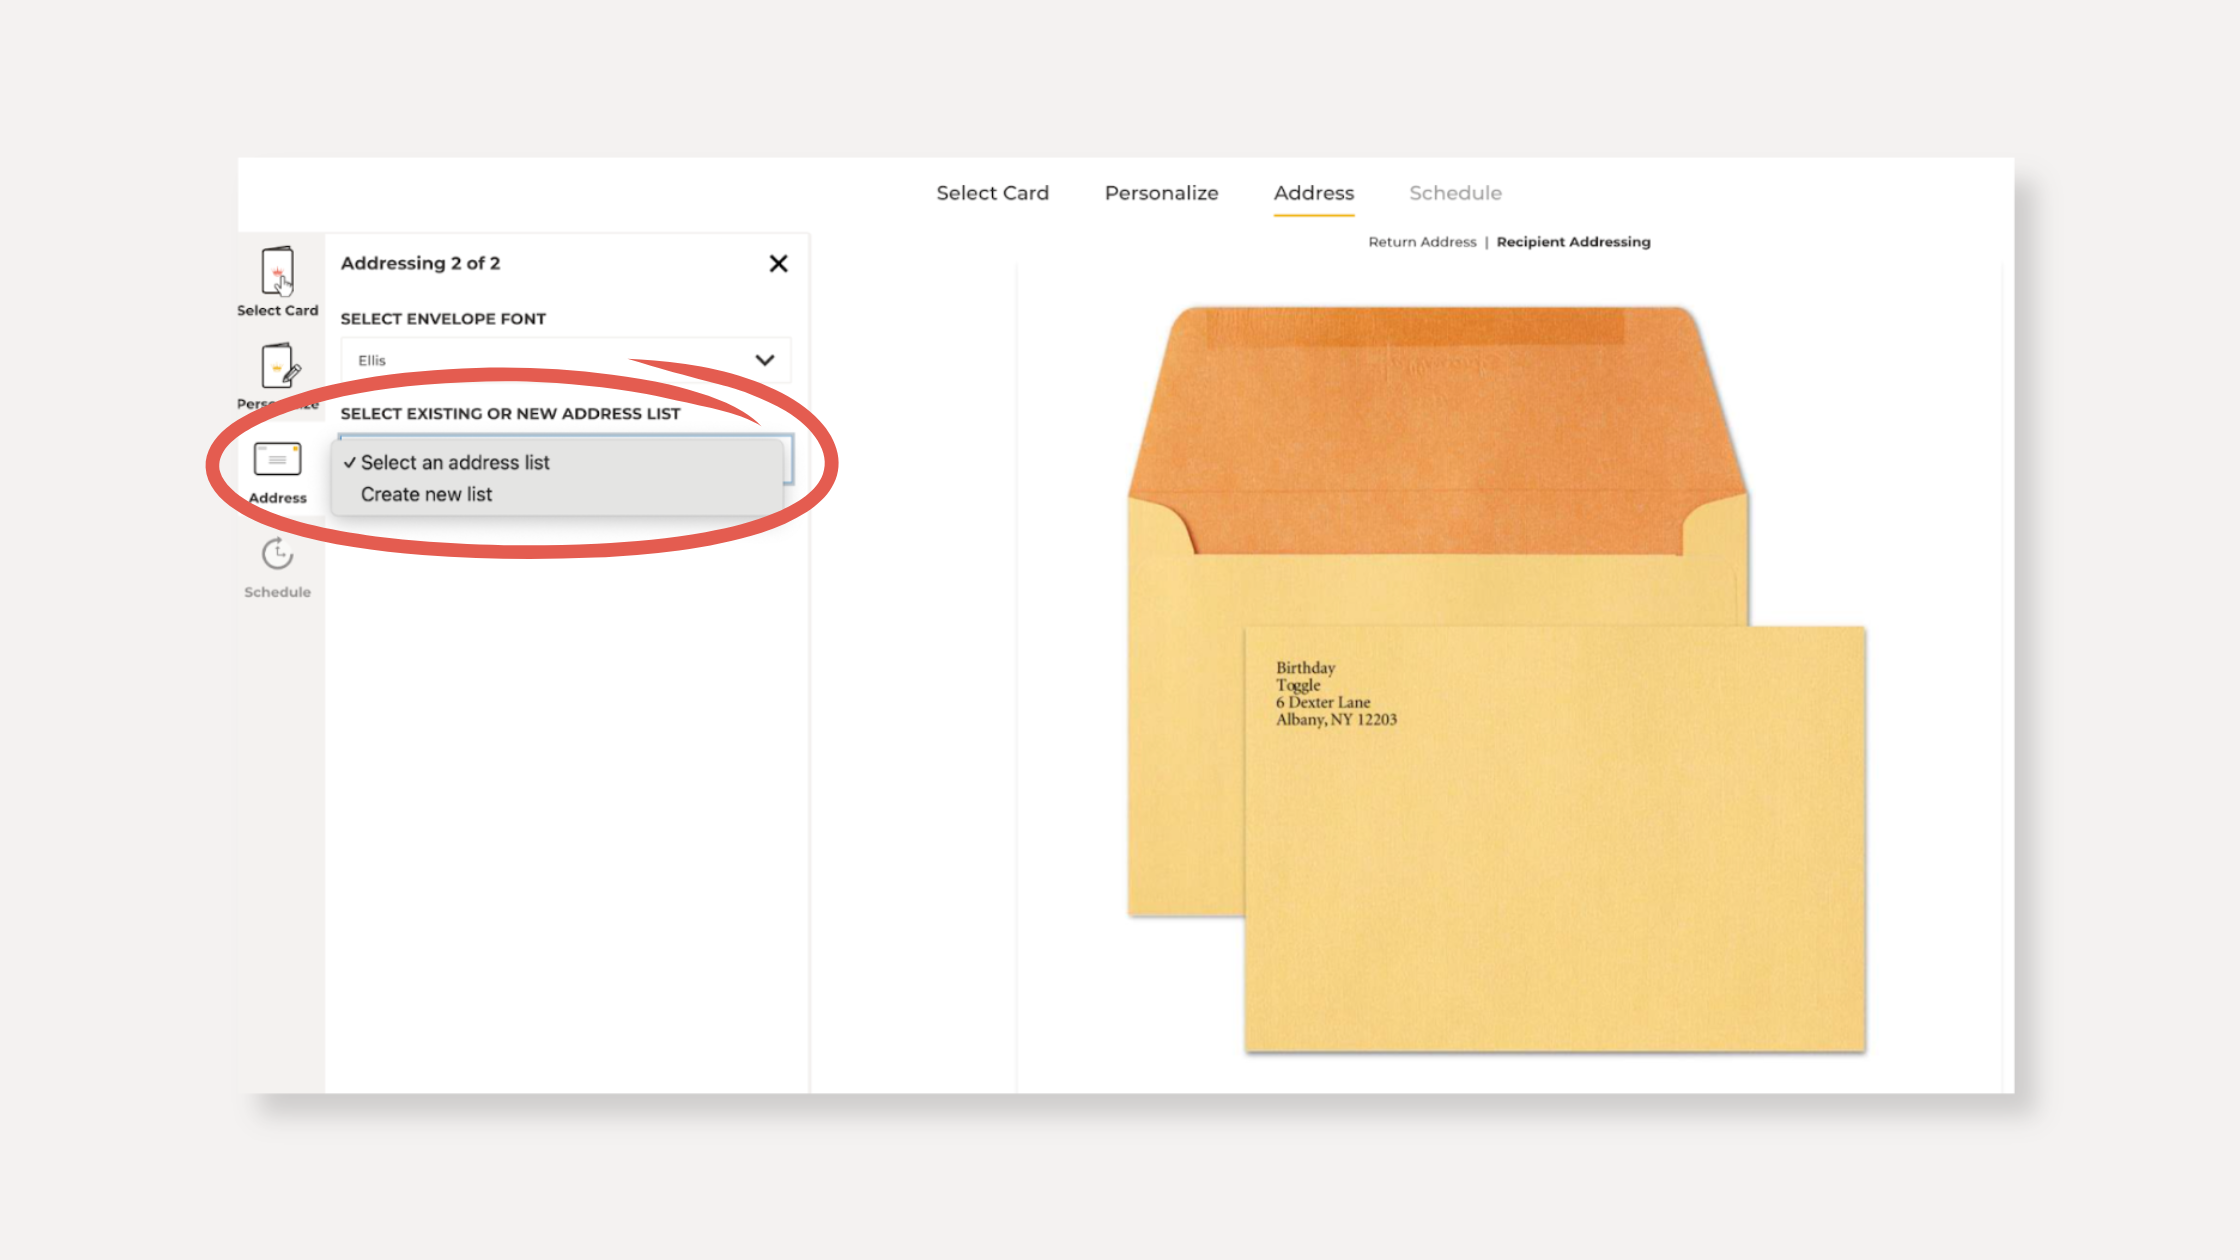
4. Name your list, add a description, and select ‘Add Contacts > From File.’
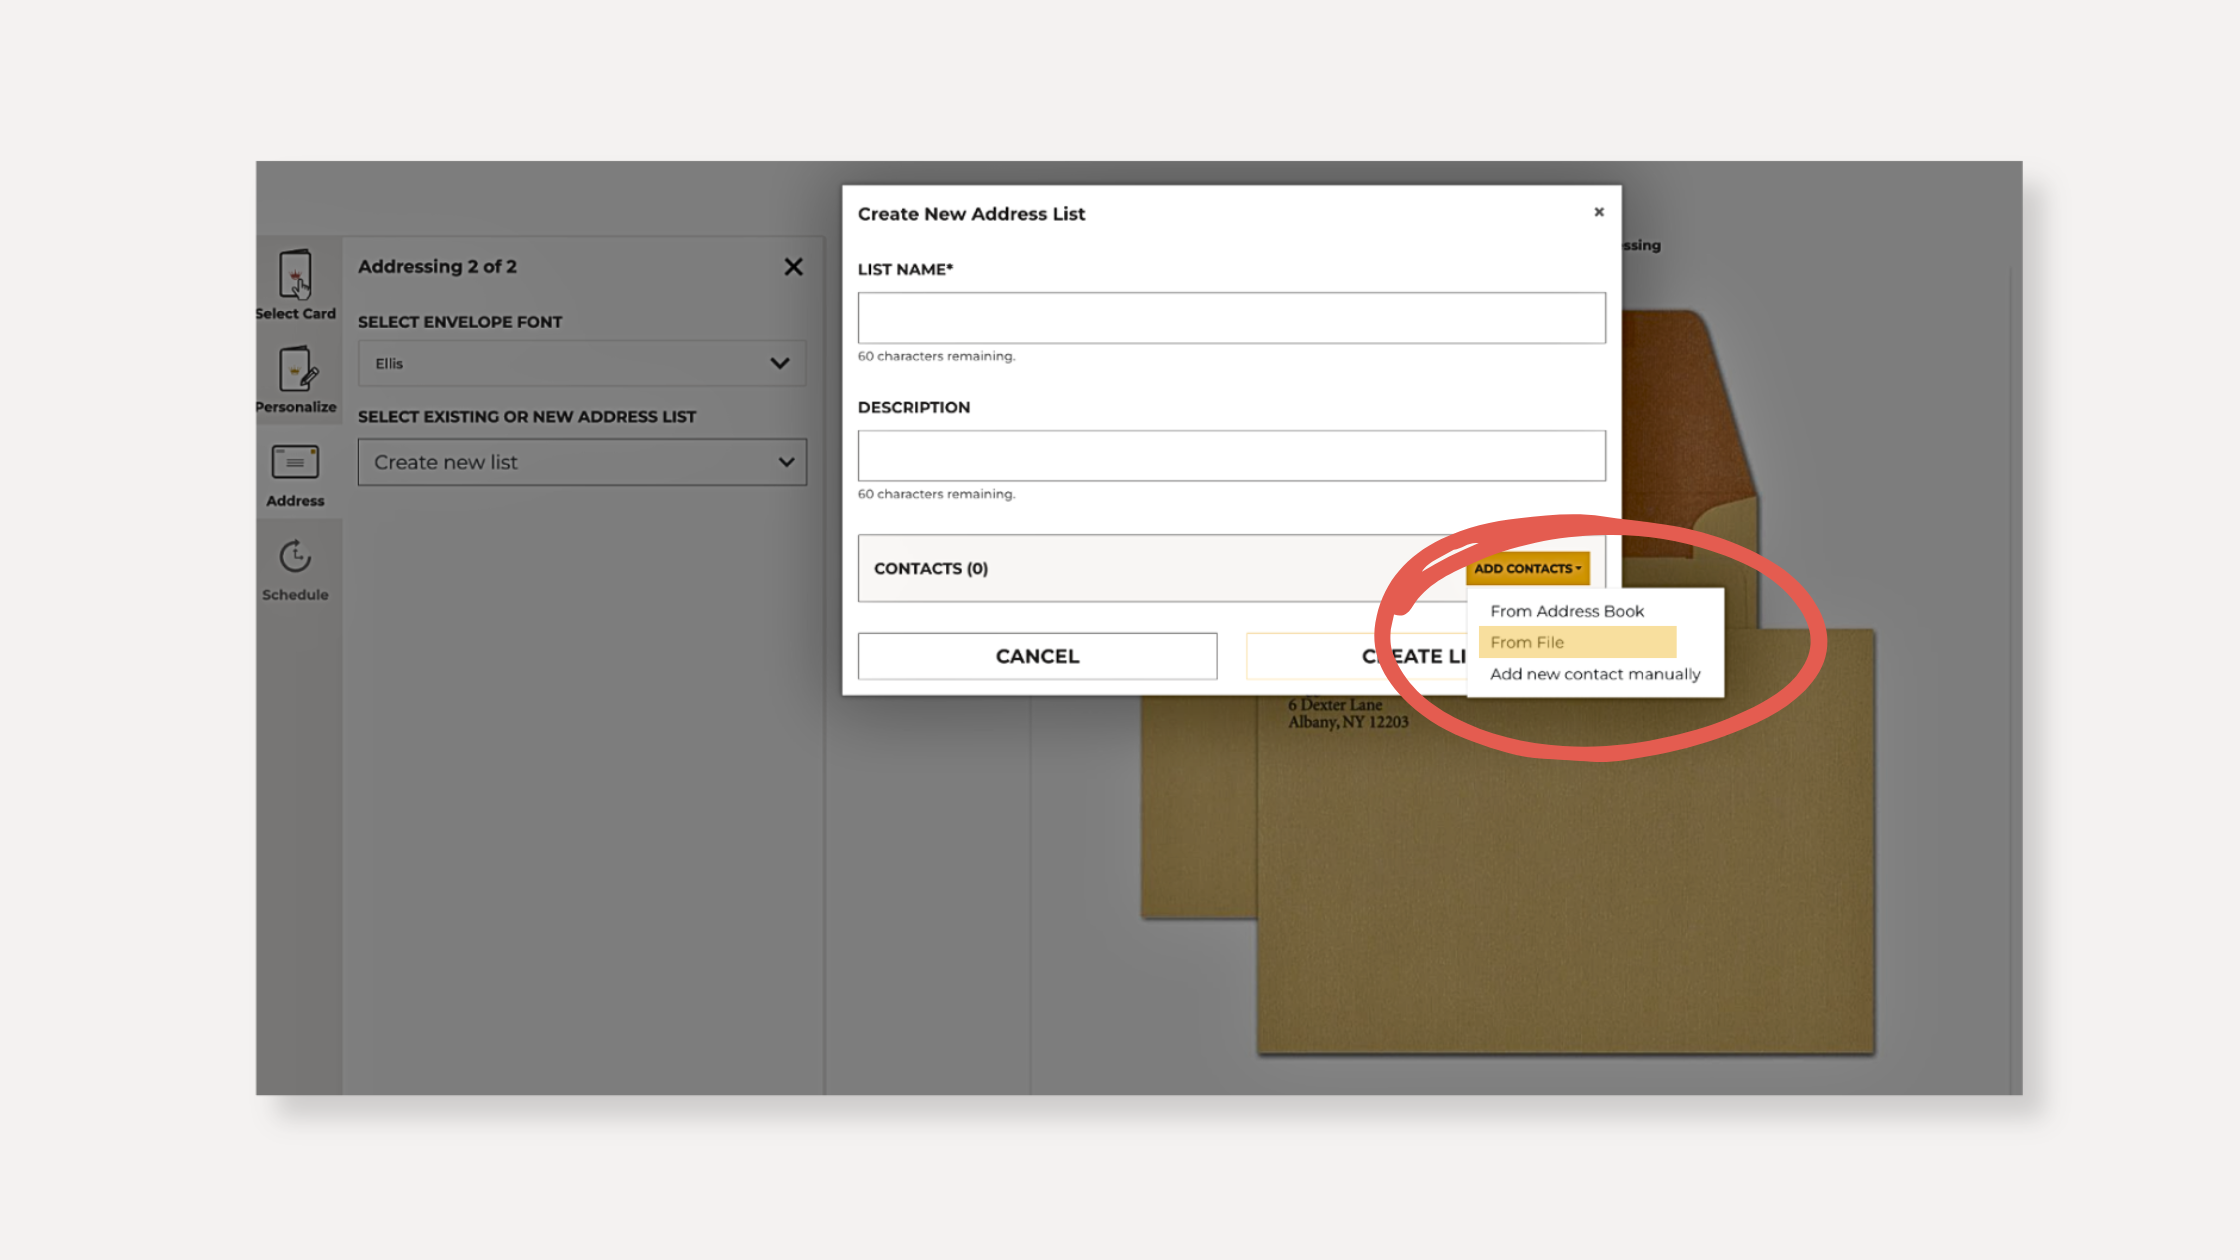
5. Then, follow the Template Download + Upload Instructions below.
Starting from ‘My Account’ to Save Lists
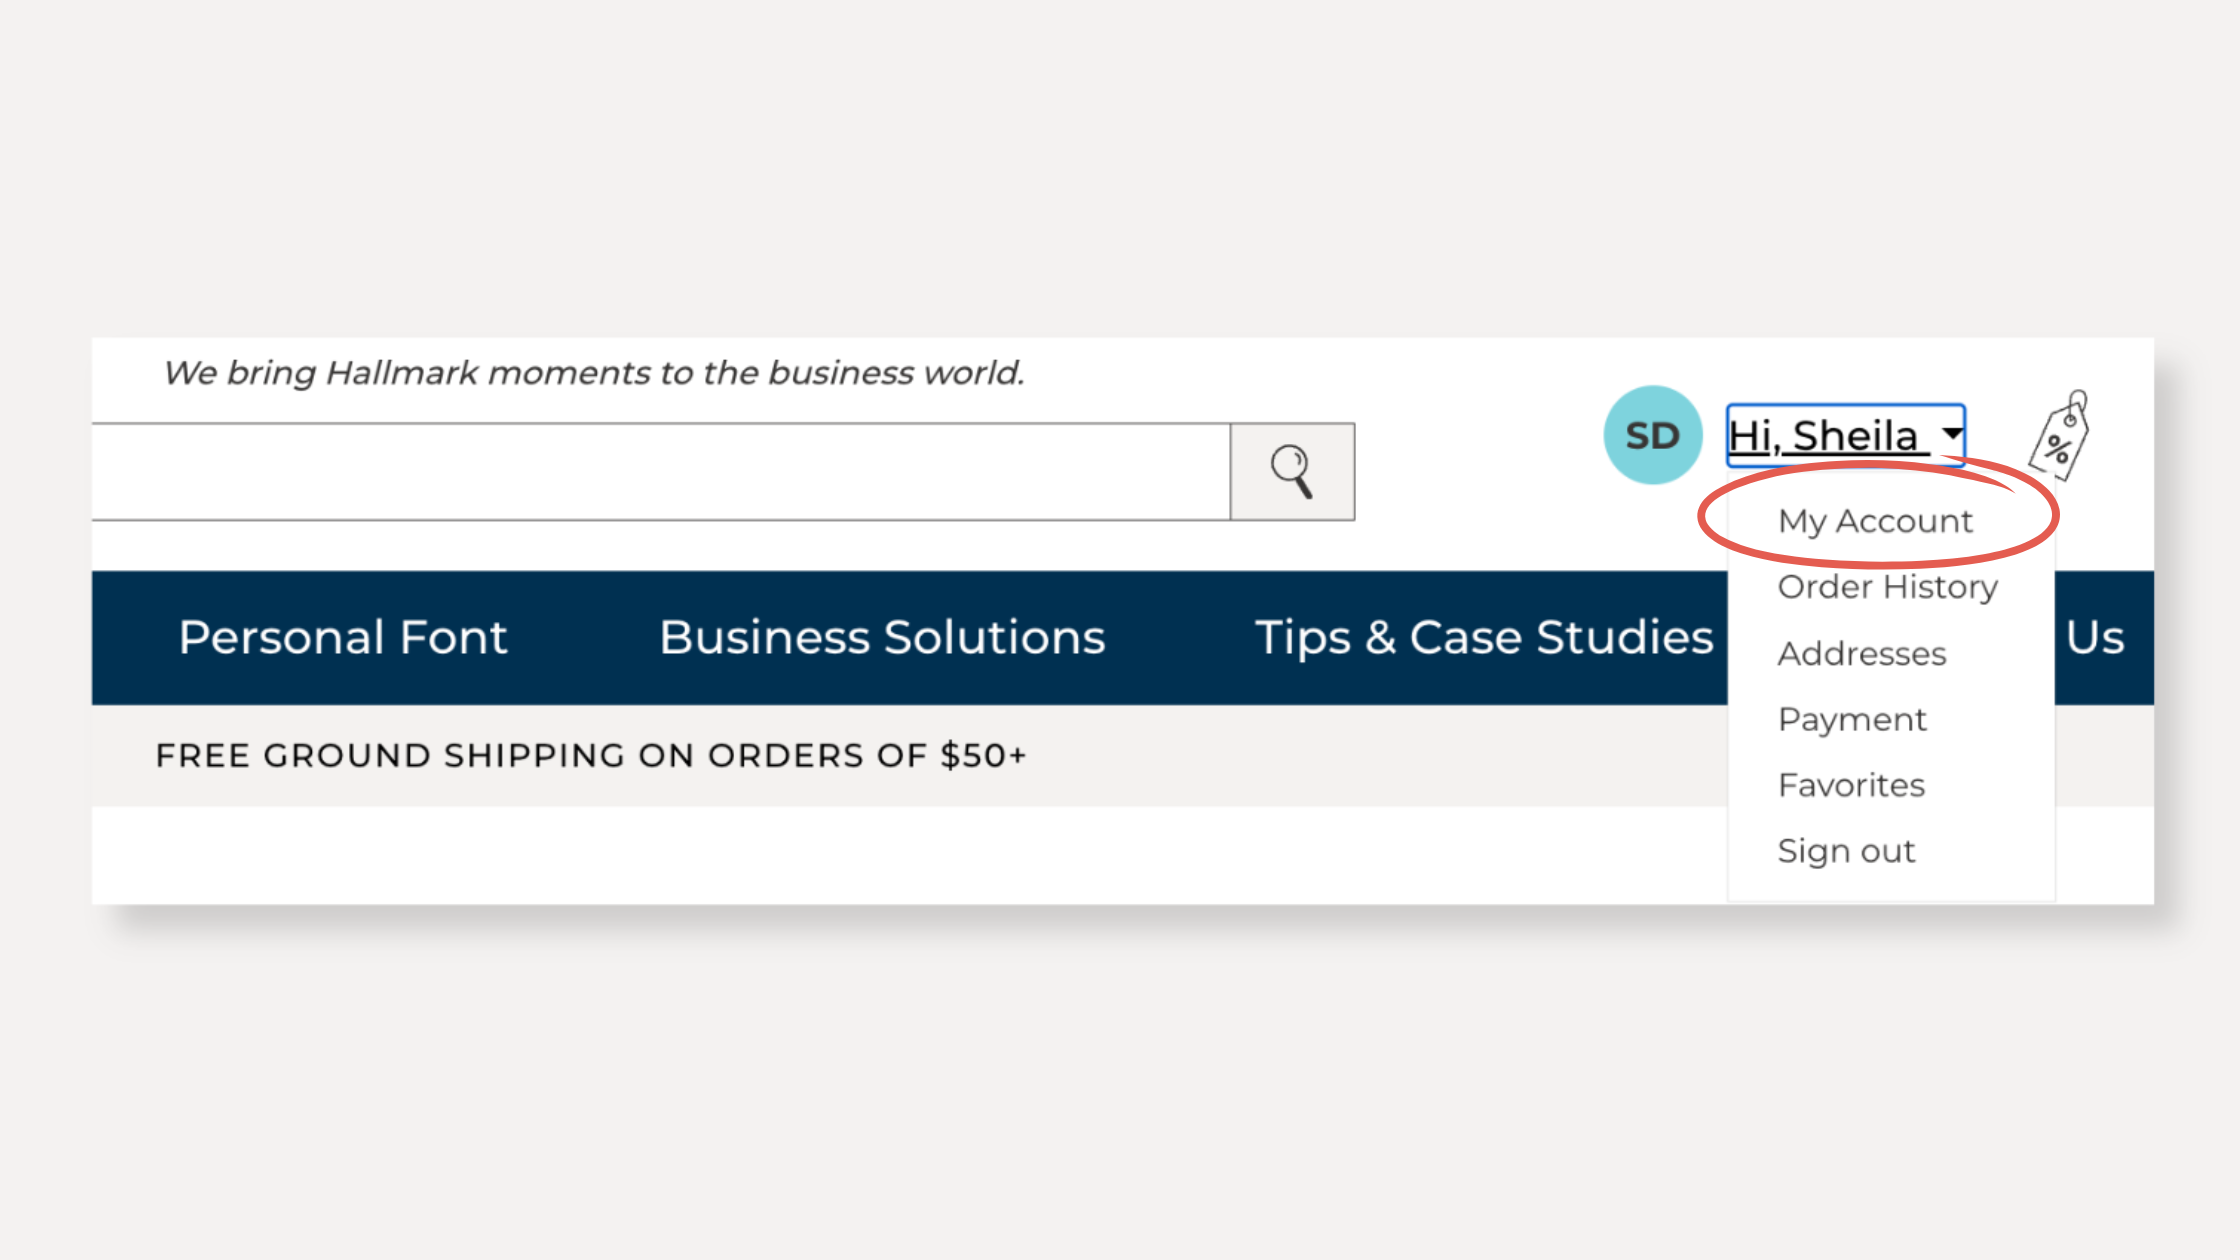
If you’d like to upload and store lists for future use:
1. Navigate to ‘My Account’ (top right corner).
2. Click ‘Address Book’ under the ‘My Library’ section.
3. Select the ‘Address Lists’ tab and click the yellow ‘Create List’ button.
4. Name your list, add a description, then select ‘Add Contacts > From File.’

5. Then, follow the Template Download + Upload Instructions below.
Template Download + Upload Instructions
1. Click the purple ‘Download Template’ button.
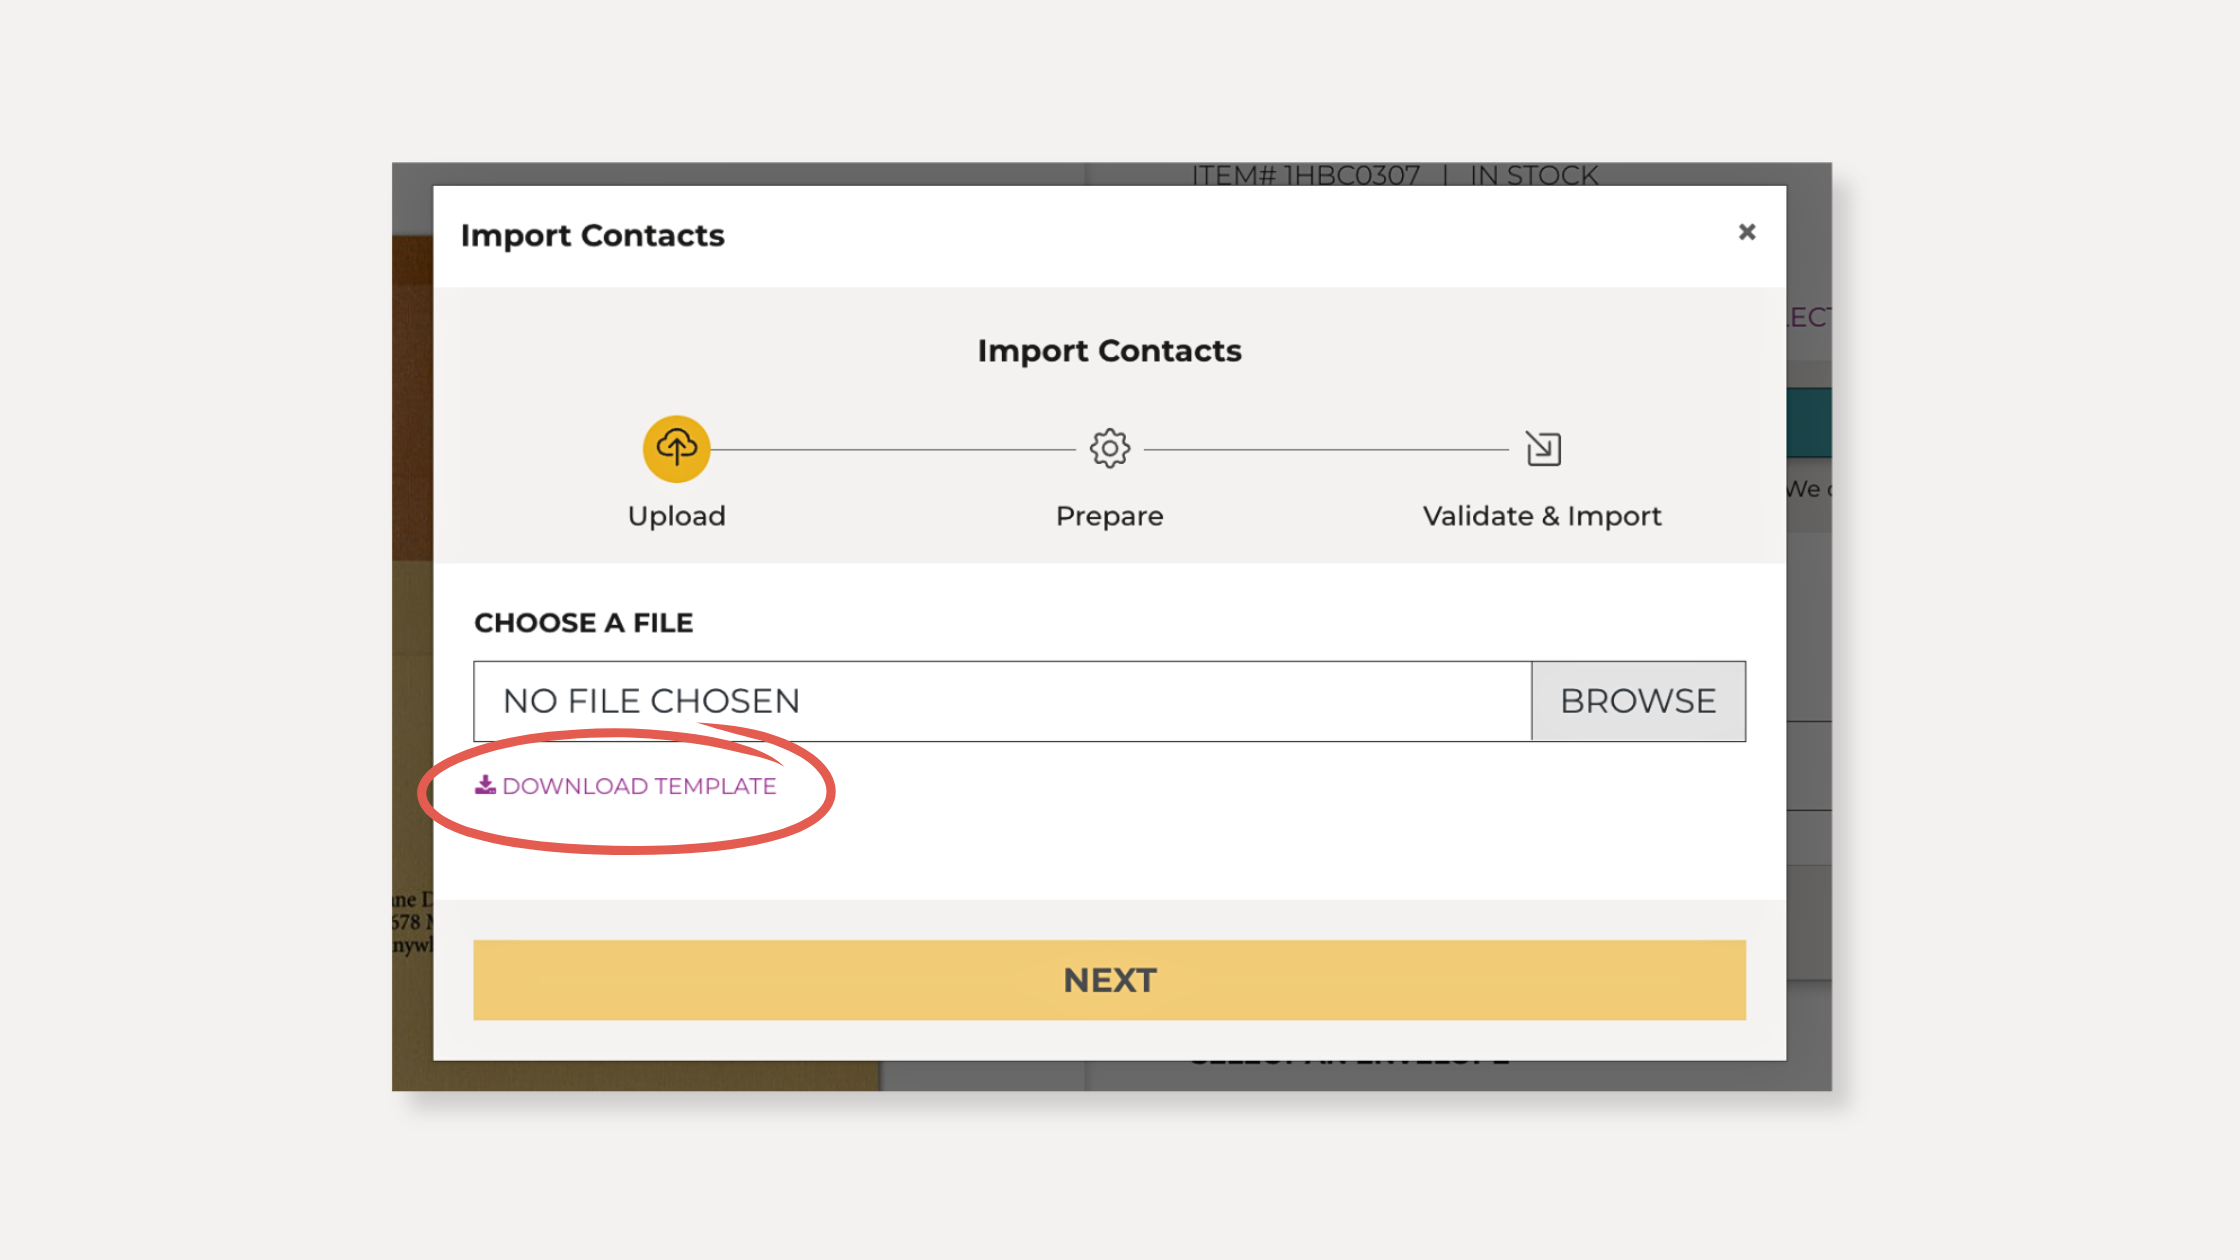
2. Open the Excel file and fill in your contact details
Required Fields: Mailing Name, Address 1, City, State, and Zip*
*Other fields, like birthdays or anniversary dates, may be required for automatic mailings depending on the occasion.
3. Save your file.
4. Upload it, then click ‘Next.’
5. Select the header row to match fields correctly, then click ‘Next’ again.
6. Double-check your mapped fields, then click ‘Import.’
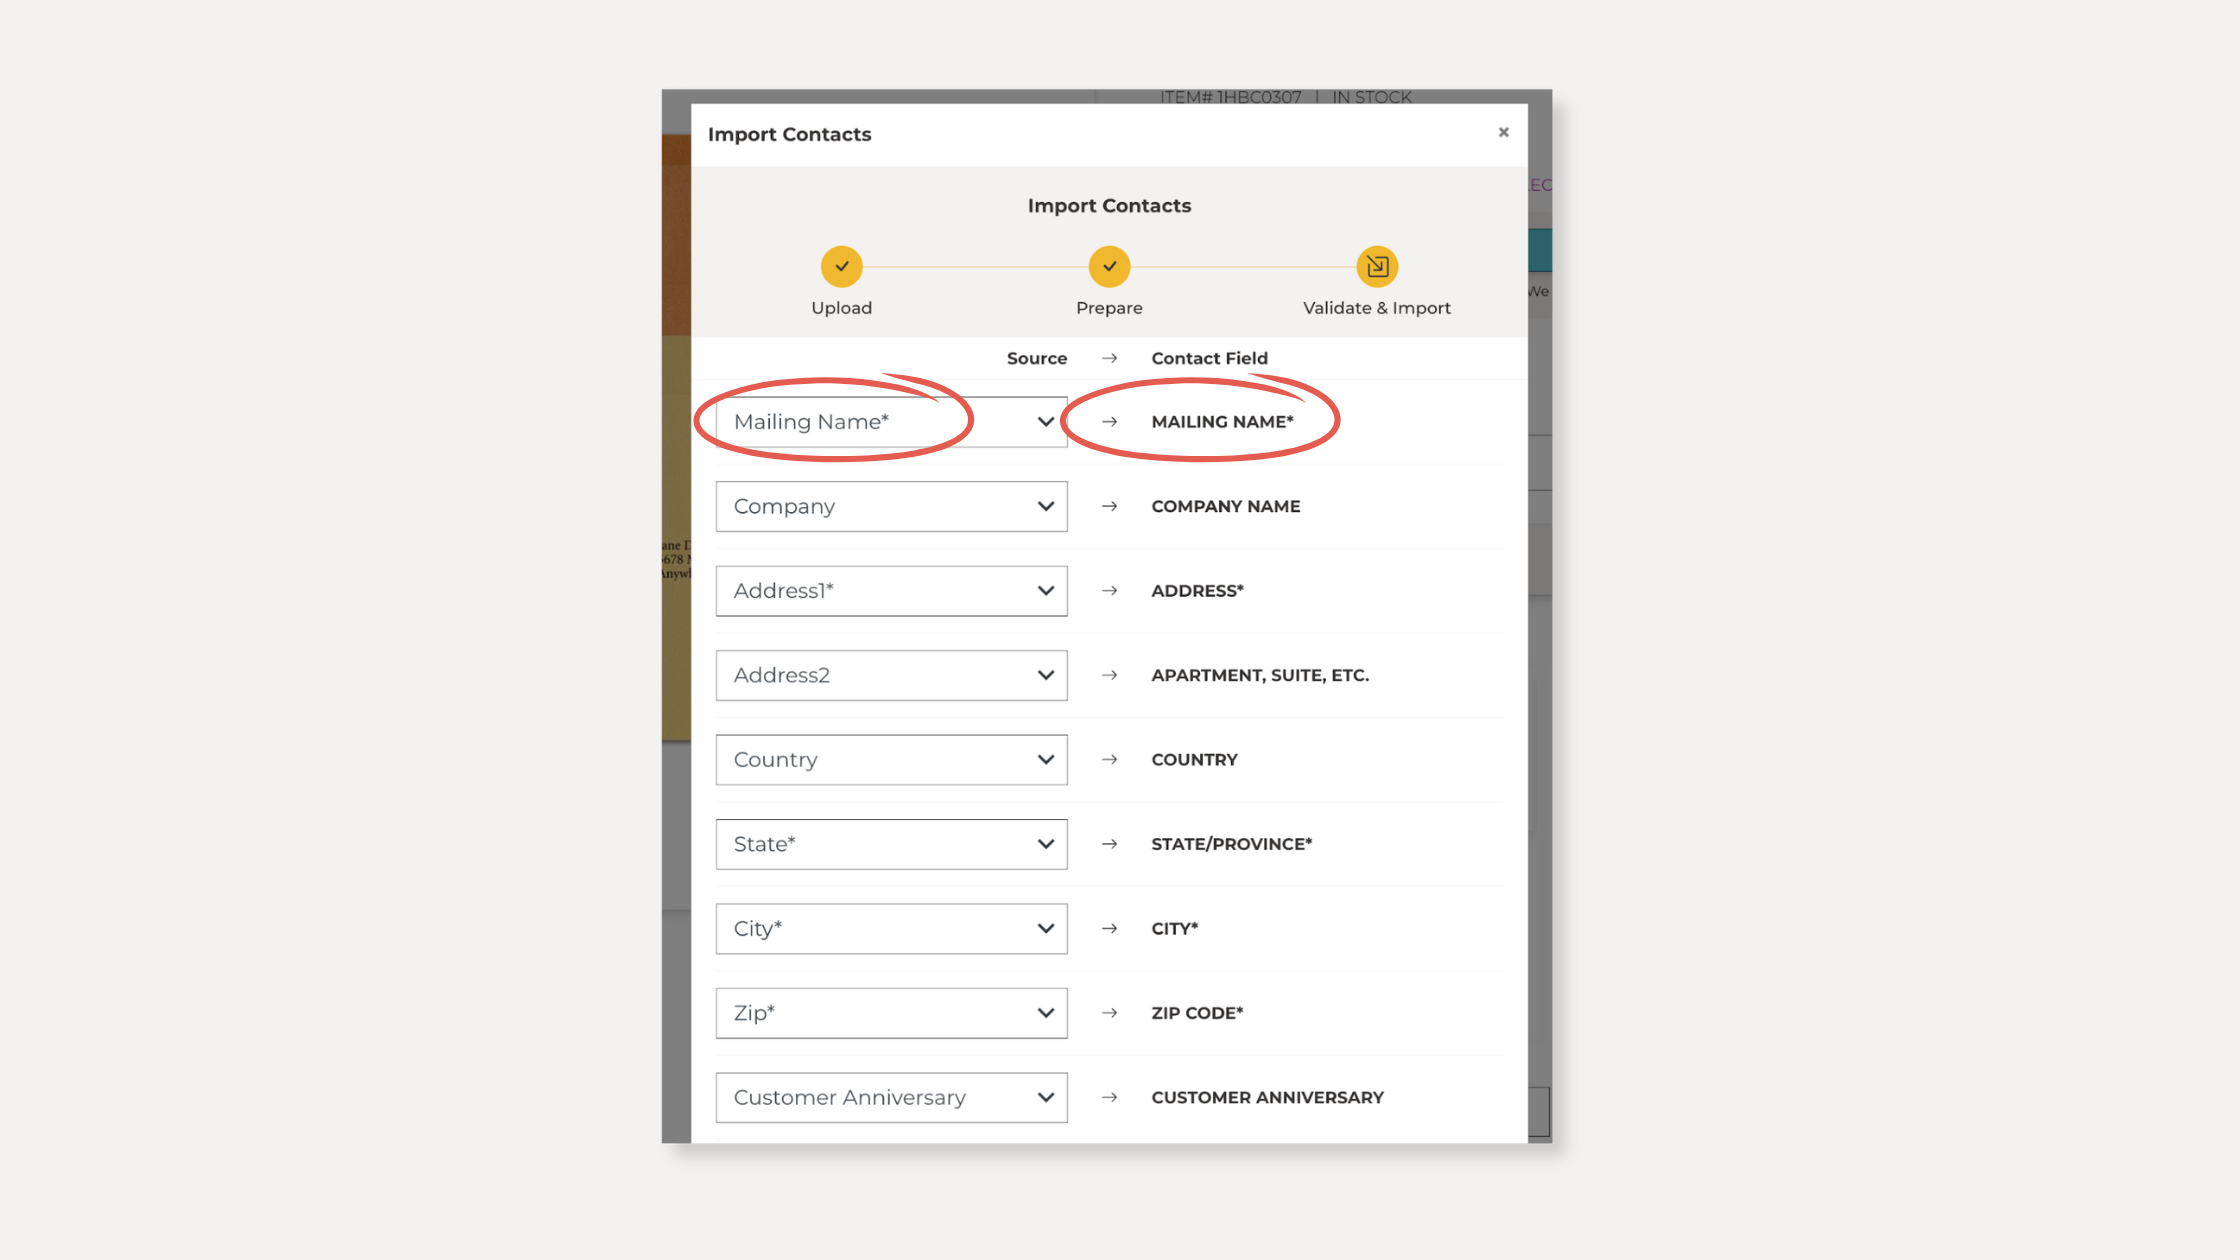
Your Address List is now ready to use!
Keeping Your Address Book Updated
Just like relationships, your Address Book needs a little attention from time to time.
Recommended Practice:
Review and refresh your contact list at least quarterly—especially before seasonal mailings.
🎉 Happy card-sending! 🎉
With your Address Book set up, sending personalized Hallmark cards has never been easier. If you have any questions, our support team is happy to help.
Frequently Asked Questions
Are there required fields when uploading my list?
Yes. There are five required fields marked with an asterisk (*). These are: Mailing Name, Address 1, City, State, and Zip. If you plan to automate birthday or anniversary mailings, those dates must also be included.
Are my lists automatically saved?
No. For your privacy and security, lists are only saved once uploaded into your account.
Can I segment or group contacts?
Yes! You can upload multiple address lists, organized by customer tier, region, occasion, or department.
What if I want to update my list later?
You can add, edit, or delete contacts at any time from ‘My Account.’
In this Article
-
Why Setting Up Your Address Book Matters
-
What You’ll Learn in This Guide
-
Watch the Video Tutorial Below to Get Started:
-
Starting from ‘Shop Now’ Selection
-
Starting with ‘Automatic Mailings’ Setup
-
Starting from ‘My Account’ to Save Lists
-
Template Download + Upload Instructions
-
Keeping Your Address Book Updated
-
🎉 Happy card-sending! 🎉
Products


Similar Articles